

The guidelines on this page are for those of you who want to install GTX on a new computer, transfer all your data and settings to it, and use GTX on both computers.
If you haven't already purchased a second computer licence, you can do so from the add-ons in the GTX store (opens in a new tab).
Once your second licence has been activated, the GTX registration process will recognise that you do not need to 'deregister' your original GTX.
Below are the steps to download, install and register GTX on your new computer. After installing on the new computer, you will transfer data and settings from your current GTX to the new GTX to make the new GTX a 'clone' of your current installation.
The first thing you need to do is to take note of the GTX Machine number of your existing GTX program (on your 'old' computer').
To get the Machine number, open GTX and on the menu bar, click on 'Help>About'.
Please note down the Machine number and your GTX logon name (eg GTX_XXX_999).
You will also need a USB memory stick of sufficient capacity to copy the whole .\GTX folder (in File Explorer/Windows Explorer) to the USB stick. To check how much capacity you need, in File Explorer, right-click on the <.\TRB\GTX folder> and click 'properties' from the pop up menu. When it stops counting, you will see the 'Size on disk' which will be the minimum capacity of the USB stick that's needed.
To start, plug the USB stick into your current computer, and using Windows File Explorer, copy (or drag) the GTX folder (with all its contents) onto the USB stick. Check that everything has copied across, then remove the USB stick from the computer.
On your new computer, download and install a new copy of GTX...
Download and Install GTX

Download the GTX installer: gtxinstall.exe (about 200 MB). Its SHA-256 is a61021e351980418b7e15bfebd8d0a308f6f8d19391ff91ce2d522973d0d462c.
Depending on the browser you use, and the options that are in use, you will get an option to run the file, or save the file. The browser may also automatically save the file to the download folder that is specified in your browser's settings.
When the file (GTXInstall.exe) has downloaded, locate it and double click it to start the installation process.
After GTX is installed, and before you open it, it is imperative that you do the following...
Locate the GTX icon that you will click on to start GTX (usually the GTX icon on the Desktop) and RIGHT-click it and select 'Properties'.
In the 'Properties' box, there are two settings you must change:
(1) On the 'Shortcut' tab, click the 'Advanced' button.
In the 'Advanced Properties' box that opens, select the 'Run as Administrator' option, then click 'OK'.
(2) On the 'Compatibility' tab, in the 'Privilege Level' section, select the 'Run this program as administrator' option.
Then click 'Apply', then click 'OK'.
Once that's done, start GTX, and the Registration Wizard will open and guide you through the registration process.
On the first page of the Registration Wizard, you need to select the option...
I am already registered,
I would like to add this machine to my list of authorized GTX machines.
On the next screen, in the Logon field, select and delete the text 'ENTER LOGON NAME HERE!', then enter your log-on, eg GTX_XXX_999 (use underscores (_), not dashes (-))
In the Machine field, enter your Original machine number
Then click Next, and on the following screen, click Send.
You should get the message: 'Machine added successfully'
A message will then tell you that 'GTX needs to connect and update system files'. Click 'OK'. GTX then connects and adjusts your subscription authorities and downloads any updated files that it needs.
A further message informs you that 'GTX has selected today's meetings to download...' Click 'OK'. After downloading, GTX will ask if you want to load the meetings. Yes, you do.
GTX is now ready for you to configure it by way of importing the data and settings you copied from GTX on your original computer.
Transfer Data and Settings
Insert the USB stick containing all your data into the new computer, then check that the GTX folder can be 'seen' by File Explorer.
Open GTX and on the Menu Bar, click on Program>Copy which opens the Copy files from another installation box. On the first use of this feature, click the Browse button to locate and click on the <GTX.exe> file in the GTX folder on the USB stick. You will see that path appear in the 'copy from' text box.
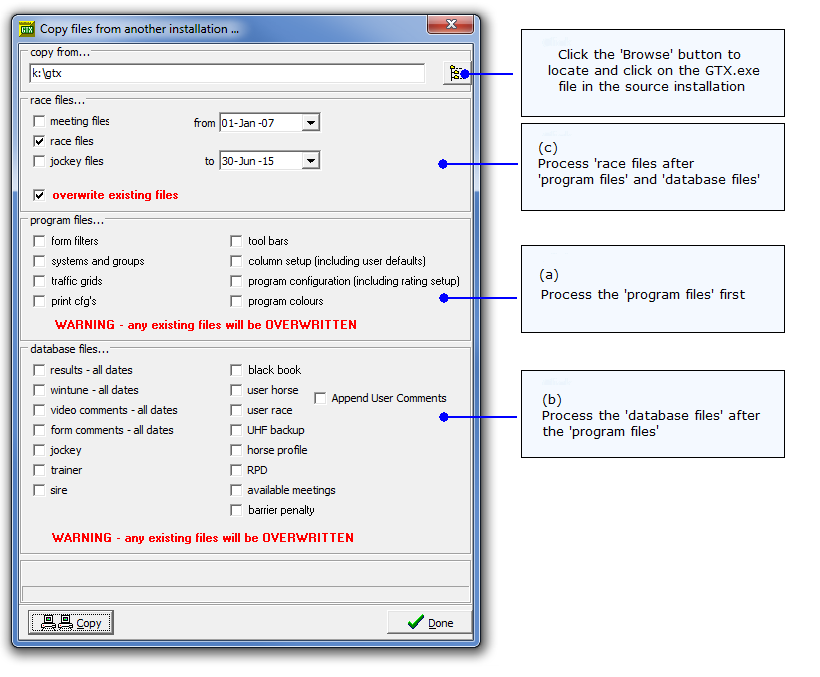
Copy' process in the following order as the (b) process relies on files from the (a) process being in place, and the (c) process relies on files from the (a) and (b) processes being in place:
(a) Starting with no options selected in the three sections (race files, program files, database files) go to the 'program files' section and choose which data you want transferred from the 'old' GTX. (There are explanations of the options on this page below, but you can choose all the options if you prefer - the copy process will copy only those options that are applicable to your situation).
Then click the 'Copy' button. When the process has finished, click the 'Done' button.
(b) Open the 'Copy' box again. The path to the 'old' GTX should still be selected in the 'copy from' field, so deselect the 'program files' options and this time go to the 'database files' section, make your choices and click 'Copy'. (Please do not select Video Comments, Jockey, Trainer or Sire) When finished, click the 'Done' button.
(c) Open the 'Copy' box again and deselect the 'database files' options.
In the 'race files' section of the box, select 'race files'. (Please do not select 'meeting files' or 'jockey files'. They are not needed after they have been used to create the race files during the original importing process immediately after originally downloading).
Select the date range of the race files you have in your 'old' GTX.
Select the 'overwrite existing files' option.
Then just click the 'Copy' button and 'Done' when finished.
Once the transfer is complete, it would be wise to backup all databases, as the database backups are not copied from the originating computer, although the databases themselves are.
This is easily done. On the Menu Bar, click on Program>Database Backup. In the box that opens, select the relevant databases and click the Backup button.
After this process, your new GTX should be exactly the same as the old one.
Explanation of Options
Meeting files
Meeting files that you previously downloaded via the Download function, or imported from the TRB web site.
Race files
Individual race files which are automatically created from meeting files and jockey files during the importing process.
Jockey files
Imported with daily downloads and incorporated into race files during the importing process.
Form Filters
The five standard, and any user-created Form Filters, which are used on the Form View.
Systems and Groups
These are systems, or groups of systems that are used in the GTX System Developer. These can either be user-created systems, or those complimentary systems supplied by TRB.
Traffic Grids
Files created by the optional Traffic Lights module.
Print cfg’s
Print configuration files, which are created by the user defining the way in which they want their printouts formatted, and the information that is required in them. Users can set up as many print configurations as they desire. See the large section on Printouts in the online manual.
Tool Bars
The Tool Bar configuration files are the result of users modifying the various Tool Bars, and selecting the buttons that appear on them. These include the Rank Bar, Speed Bar, Mini-Speed Bar, View Bar and Filter Bar. See Setup Tool Bars in the online manual.
Column setup (including user defaults)
These files contain the information defining the way in which the various columns of information are displayed in all the GTX views, including which columns are displayed, and the order in which they are displayed. The files also contain the saved User Defaults which can be used to restore the saved setup after temporary changes have been made. See Select Columns in the online manual.
Program Configuration (including rating setup)
The current state of all of GTX’s many default and user-modified settings. These include, but are not limited to, individual Rating bonuses and penalties, market percentages, overlay references, Mud/Bog definitions, Default Print Order and the style in which odds are displayed. For a couple of examples, see Ratings Display Options and Local Time in the online manual.
Program colours
The current configuration of the user-changeable background and text colours.
See Setup Colours in the online manual.
Results – all dates
Results files contain results, dividends and morning line prices, and they are used by the Wintune Module, as well as being a data source for the Import>From HD>Dividends program function, for those that may need to reimport dividends.
Wintune – all dates
A database created by the use of the optional Wintune Module.
Video Comments – all dates
A database created by the use of the optional Video Comments feature.
Form comments – all dates
A database related to the use of the optional Form Comments feature.
Jockey
A database of jockeys, their penalties and allowances.
Trainer
A database of trainers and information relating to them.
Sire
A database of sires and information relating to them.
Black Book
A database of user-created Black Book entries.
*Please be aware if you use the Old Style Black Book that the transfer does NOT include the Old Style Black Book text files which need to be manually copied from the old <./GTX/blckbook> folder to the new <./GTX/blckbook> folder. There is a text file in that folder for each horse in your Old Style Black Book.
User Horse
A database of user-created User Horse Comments.
User Race
A database of user-created User Race Comments.
UHF backup
A database of the User Horse Flags in race files. After the Copy procedure is complete, you will need to restore the flags to your race files.
Horse profile
A database of user-created entries relating to the three elements of the Horse Profile feature: Horse Profile itself, HorsePro Flags and HorsePro Style.
RPD
The Race Profile Database is used only by the System Developer and contains parameters relating to races; for example, State, Track, Distance, Class, Going etc. It allows for much faster analysis by the System Developer when the ‘use RPD’ option is selected.
Available meetings
A database containing the meetings that appear in the Download menu when you click the Download button.
Barrier penalty
A database of individual barrier penalties applying to each barrier at each distance at each track. Also contains user-created modifications to barrier penalties carried out via the Dynamic Barrier Penalty Multiplier function.